
Quickstart
From downloading it to saying your first word to your persona takes about ten minutes.
1. Download the installer
Go to the Releases page and download the latest version:
| Your computer | Download |
|---|---|
| Mac (M1 / M2 / M3 / M4 chip) | aibutler-<version>-arm64.dmg |
| Mac (Intel chip) | aibutler-<version>-x64.dmg |
| Windows | aibutler-<version>-setup.exe |
Mac needs macOS 11 or later. Not sure which chip you have? Click the Apple menu in the top-left corner → About This Mac, and check the Chip or Processor line.
2. Install
Mac
- Double-click the dmg and drag the app (its name on disk is 全能管家, Chinese for "aibutler") into the Applications folder.
- The first time you open it, macOS asks whether you are sure you want to open an app downloaded from the internet. Click Open. The app is signed and notarized by Apple, so nothing else is needed.
Windows
Double-click setup.exe to install. If you see "Windows protected your PC," click More info → Run anyway.
3. First launch: connect an AI
The first time you open it, you'll see a two-step setup.
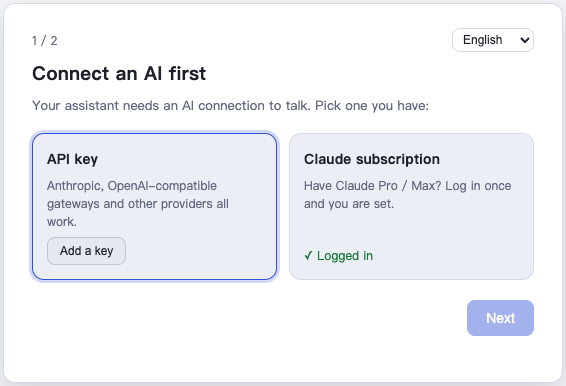
Step 1, "Connect an AI first": your persona needs an AI model before it can talk, so pick whichever you have:
- API key (selected by default): works with Anthropic, OpenAI, Chinese model providers and gateways. Click Add a key; System Settings opens on Model providers. Click + Add one, then click your provider (Qwen, DeepSeek, Kimi…) — the address is filled in for you, you only paste the key (see Connecting Models).
- Claude subscription: pick this if you have a Claude Pro / Max subscription. Click Turn on — it first downloads Claude's components (about 110 MB) — restart once that's done, then click Log in to Claude and sign in once.
You can switch the interface language in the top-right corner. Once you're set, click Next.
Step 2, "Give it a name": this is your first persona — it's called "Butler" by default, but you can rename it and pick an avatar.
With a key, it then asks How capable? — four tiers, Top · pricey, Strong, Everyday · recommended and Budget; stronger costs more. Click one and the app tests your key on the spot to find a model in that tier, and tells you which one it will use. If the tier doesn't work on your key, it says why (no quota, model not enabled on your account…) and offers Try a cheaper tier. To choose the model yourself, open Pick a model myself. Click Create and start.
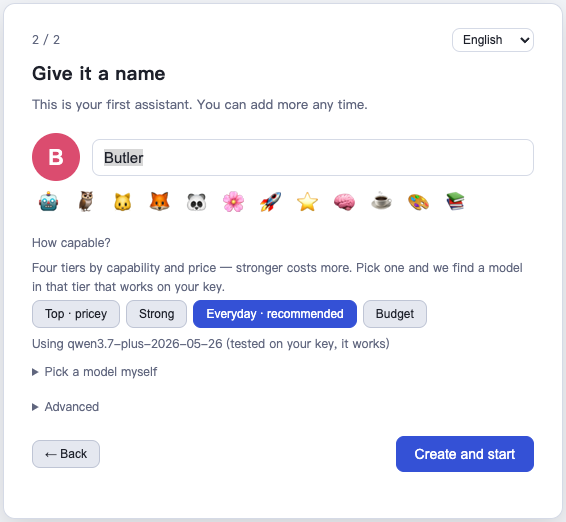
Two items under "Advanced"
You usually don't need to touch Engine or Persona files go in. A persona's file location can't be changed once it's created — if you want it on a different drive, click Change location before creating it.
4. Say your first word
Once it's created, the persona spends a minute or two getting to know itself, then greets you first: who it is, what it can do for you, and what you'd like it to focus on. Just answer it.
When you can't think of what to ask, tap one of the buttons above the input box (such as "Remind me on time" or "Look it up and compare") — tapping sends it for you. Or say anything, for example:
Hi, I'm Wang. I work in design — from now on, help me keep an eye on things at work.
It will remember what you tell it and pick up from there next time. From then on it speaks up once a day, and the first time you talk to it each day it mentions one thing that is due soon or unfinished after answering you. A few things you can just ask it directly:
- "What can you help me with?"
- "I'd like to reach you from my phone too — how do I set that up?"
- "Build me a small expense-tracking tool."
5. Create more personas
Click Personas ▾ at the top of the window and choose + New persona… and fill in a name; with a key you pick a How capable? tier here too. Click Create and open. Each persona has its own name, memory, and model, and they don't interfere with each other — for example, one to handle work and one to help your kid study.
The same menu's ⚙ Manage personas… opens the Personas window: each persona card's ⋯ menu lets you Export it, and Import from file… below lets you load an exported persona back in.
Running into trouble
Ask your persona first. If it can't connect to a model or won't talk, see the FAQ in Connecting Models.